Sewing Onesies, Jumpsuits, and Pajamas for your BAB
These sewing instructions apply to many of my sewing patterns, so you can use these steps as a guide for making many of the BAB costumes or BAB fashions you'll see in my shop!

The BAB Basic Jumpsuit Sewing Pattern can be used to make onesie pajamas that look like this (above). But if you want footies, you'll need the other sewing pattern.

The BAB Footie Onesie Pajamas Sewing Pattern can be used to make onesie pajamas that look like both of these (above AND to the left).
Aside from the footies, these two outfits follow the same sewing pattern. One has footies, one doesn't, but everything else is identical. Therefore the sewing instructions are nearly the same, from start to finish!
And you'll notice many of my other sewing patterns have a similar (if not identical) construction for one or more elements of each outfit or costume. The suit part of my BAB Wookie or Sasquatch Costume Sewing Pattern? It's the same as my BAB Footie Onesie Pajamas Sewing Pattern! Well, except for the sleeves... Take a look, and you'll see many similarities among my patterns. So these sewing instructions will serve you well, I assure you!
The very first step is to cut out your paper pattern pieces. Try to preserve the original lines of your paper pattern by cutting along the outermost edge of each line. Then pin each paper pattern piece to your fabric, and cut your fabric according to the shape of your paper pattern.
The standard seam allowance marked on all my BAB patterns is 0.25 inches (which should comfortably accommodate a 16-inch Build-A-Bear Workshop toy, or "BAB"). Depending on the size of your bear, you may want to increase your seam allowance, without adjusting the pattern. Doing so will make the resulting shirt slightly smaller in size, which is appropriate for both 15-inch and 14-inch bears. But if your bear is not any smaller than the standard 16-inch BAB, and you still prefer a larger seam allowance, you should adjust your paper pattern before cutting your fabric! (I understand many Japanese sewing patterns do not include seam allowances at all... Here is a blog entry about how to add seam allowances to your patterns, from a blogger who may also lead you through other advanced sewing tips!)
After you've cut out all your fabric pattern pieces, you'll need to match each of the (two matching) "back" pieces to the (one single) "front" piece, aligning them at the shoulders. The "right" sides of the fabric should face each other, so that you're assembling this garment "from the inside out".
Sew these pieces together (face-to-face) at the shoulders. Use pins to secure the alignment, if it helps!
Next, you will need to run a seam at each shoulder using your sewing machine. Until you're ready to use the machine, simply pin these pieces together at each shoulder to secure their alignment. The seams at each shoulder should be simple straight lines, following the edge of your fabric.
After you run each seam, open these seams and press them flat — see below. Flattening these seams will help to reduce unnecessary thickness or bulk, improving the look and feel of subsequent seams along the neckline and the shoulders where they meet your sleeves.
Open the seams at each shoulder and press them flat. It should look like this from the "wrong" side (on the left) and from the "right" side (on the right).
My sewing pattern for this garment includes pattern pieces for sleeves, but adding sleeves is actually optional. If you prefer a sleeveless garment, simply hem these edges rather than add sleeves.
Joining sleeves to the body of your garment can be a difficult step, because of the difference in curvature between your pattern pieces (and because of the diminutive scale!). As you can see in the image below, this puzzle doesn't look like it will fit together. I assure you, it will!
Pinning the sleeves in place will definitely help fit these pieces together. Take your time!
Placing the sleeves can be tricky, even with pins! Take your time and try to make it as smooth as possible. If the sleeve appears to be wider than it needs to be, you may be right. Just try to center each sleeve until you have an equal distribution of excess on either end of the seam. Take your time running these seams on your machine, as well. Rushing through it could result in unsightly buckling, creases, or other mishaps that call for a seam ripper to remedy...
The result should look about like this (see below):
When the sleeves are done well, it should look like this!
Now, turn the hem around the collar and run a simple edge seam. You're welcome to use other solutions or embellishments, as well, to dress up this edge according to your own taste or ability (like bias tape, or piping? maybe even some lace!). This is just the very simplest method. If you turn the hem further (to accommodate a larger allowance), the opening around your neckline will end up looking much wider than you see here. And that could be a good look, depending on the project (like a ballerina neckline!).
Turn the hem around the collar and run a simple edge seam.
To determine the desired length of each sleeve, pin the sides of your garment closed with the "wrong" side facing out, and then fit it on your bear. Fold the cuff up and away from the paw until you are satisfied with its length. I usually try to expose the BAB logo on my bear's paw. Pin the edge in place to secure this position or else mark the crease to remember the desired length. You can compare both sleeves to determine that they are equal lengths after you remove the garment from your bear.
Fold the sleeve cuff up and away to expose the BAB logo. Pin it!
No footies? Fold the leg cuff up and away, and then pin it.
If you're not planning to add footies (or the pattern you're using doesn't include footies), this may be a good time to adjust the length of each leg, as well! The procedure is basically the same. But if in fact you will be adding footies, then don't bother hemming the legs!
Now to hem the sleeves... I like to turn a hemmed edge twice, whenever possible. This way, the raw edge of my fabric will be enclosed within the hem, reducing the risk of unsightly, unraveling threads over time... There's plenty of extra length, in this case! Feel free to trim some of it away, if it makes it easier for you.
Run a quick seam over the folded hem to secure it in place. With this step done, you won't have to hem your sleeves later on, when those tiny little cuffs are too small to fit easily under your sewing machine presser foot.
Now, hem the sleeves.
Mark the opening for your bear's tail. Assuming your bear has a tail, then do not sew between these marks!
Next, we'll run a seam along the backside (in the seat area, below the typical BAB's tail). This seam will usually run from the crotch to the tail. Refer back to your paper sewing pattern pieces before you run this seam, because I have marked where the tail should be! Your bear may not have a tail, but most BAB's do, and so you might want to place an opening there to allow for the tail to come through.
Simply transfer/translate these marks from your paper pattern pieces to your fabric. If you want the tail to show, your next seam should END before these marks. I prefer to use a water-soluble, disappearing ink, so I make these marks with a fabric marker specifically designed for this purpose!
In the above photo (on the right), you can see that my stitches (yellow) stop precisely at one of my marks (blue). Now open the seam and press it flat. When you do so, the edges around your tail hole will naturally turn, also. I like to take this opportunity to hem the edge around my tail hole.
Sometimes, I run the stitches along the entire seam, as you see in the image below. This results in visible topstitching on the "right" side of my garment. The effect of topstitching like this could be undesirable for plush fabrics, such as fur, or fabrics with a fine sheen, such as satin or silk — something to remember if you're making costumes, rather than flannel pajamas!
Finish the edge around your tail hole.
Line up the crotch front to the crotch back. Pin to secure, if it helps.
Align the front and back sides of your garment at the crotch, with the "right" sides facing each other. Pin to secure, if it helps you keep these pieces aligned properly. Now you can run a single seam along the inside of both legs, turning gently to follow the curvature in the tightest point of the crotch. The result should look something like this (see below):
Run a seam on the inside of both pant legs.
What to avoid: wrinkles around the crotch!
If you were to turn the garment "right" side out, at this point, you might see some unsightly wrinkling or buckling around the crotch. This will tend to happen in the case of non-stretchy fabrics, like woven cotton or (in this case) cotton flannel, as opposed to high performance knits. But it could happen with any material! There is a very simple step to preventing this: Clip the Curves.
To "clip the curves", make a few snips within the seam allowance using a pair of scissors. Just try to avoid cutting through any of your stitches, and you'll be fine. If you happen to accidentally sever one or more stitches, try your best to run the seam again, placing your new stitches precisely in line with your original stitches...
To avoid unsightly wrinkles at the crotch, remember to clip the curves!
After you clip the curves, your crotch seam should look more like this from the "right" side out.
As long as you remember to clip the curves before you turn the garment "right" side out, the crotch seam should look more like this (see above) from the front (left) and back (right) while lying flat.
This next step is optional...
** No Footies? Hem the cuffs, now! **
If you're not planning to add footies to this garment (or if your sewing pattern doesn't include footies), you should now hem each pant leg. —But if you ARE planning to add footies, be sure to skip this step!
OPTIONAL: Hem the cuffs ONLY if you don't need or want footies.
Shall we continue?
Now align the front and back sides of your garment. Your next two seams should run from the cuff of each sleeve, down the side, to the cuff of each pant leg. Make sure the finished edge of each sleeve cuff are precisely aligned. And make sure your raw edges all the way down the side are also lined up really well. If you have hemmed the cuff of each pant leg, you may need to adjust the alignment until those finished edges are precisely aligned, too. Otherwise, don't concern yourself much with the lowest edge of each pant leg!
Now, run a seam along the right and left sides of your garment. These seams should start at the cuff of each sleeve and end at the cuff at each leg.
What to avoid: wrinkles under each arm!
If you were to turn the garment "right" side out, at this point, you might see some unsightly wrinkling or buckling around each of the underarms (or armpits). Remember to Clip the Curves! After a few snips, each side seam should look more like this (see below) once you turn the garment "right" side out.
Clip the curves to prevent bunching and wrinkles!
** How to Add Footies! **
Now for the footies... With the "wrong" side facing out, your garment should look much like this (below), because you should NOT have hemmed each pant leg. Use your seam-ripper, if necessary, to take the hem down before proceeding...
...Unless you didn't want footies, in which case skip these steps! Scroll down to "FINAL STEPS!", instead.
You should not have hemmed the pant legs if you plan to add footies!
When you cut out your fabric pattern pieces, you should have cut 4 pieces from the same fabric and cut 2 pieces from a contrasting fabric. Each footie requires two sides and one bottom. That'll give you two footies!
Align two of the four matching pieces, with the "right" sides of the fabric facing each other. Sew these two sides together with a seam at the heel and a separate seam at the toe. It should be possible to wear the footie like a bracelet, now, if you've done it correctly, because there are two openings.
I like to open my heel seam, press it flat, and run a topstitch over the seam allowances. But that's entirely optional!
Run a seam along the toe and the heel of each footie.
And remember that you have two footies!
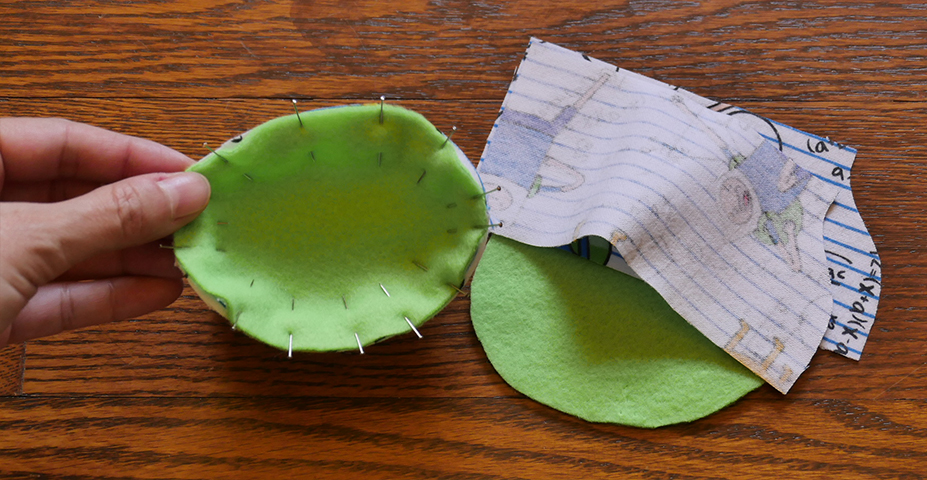
Pin the bottom in place to make the footie round.
With the heel and toe seams closed, you can now make the footie round by adding the contrasting bottom piece. Push the round bottom into place until the edges of your contrasting fabric meet the edges of your main fabric. In this case, my contrasting fabric is a green fleece material, and my main fabric is a printed cotton flannel.
You can see that my green fleece bottom piece appears concave, at this point. The pins help to hold it in this position, but they can easily get in the way on the machine. So take care! After I have run my seam and removed my straight pins, the green fleece still looks concave. It also looks quite round! This is good, it should look like this! (see below)
With pins.
Without pins.
Here's another angle on the before and after (see above). Both of these footies are shown "wrong" side out, one with pins BEFORE running the seam (on the left), and one without pins AFTER running the seam (on the right). ...The one on the right no longer looks concave, however, because I stuck my fingers in there!
You don't have to do it, right now, but... you'll want to remember to Clip the Curves before you turn everything "right" side out. I may as well do it now, right? Right.
Remember to clip the curves!
A footie turned "right" side out.
Slip everything on your bear for a fitting.
Slip the garment (and the footies!) onto your bear for a fitting. You should keep everything "wrong" side out, so you can clearly see all of your seams. Slip the footies on as snug as you can and adjust the pant legs until the garment looks comfortable.
Then fold the cuff of each leg up and away from each footie. Fold the top edge of each footie down and away from each cuff. Adjust these folded edges until they are just touching each other, all the way around each leg.
Pin or mark where each pant leg meets each footie.
At this point, I like to use my fingers to guide my pins where each pant leg meets each footie.
I don't mind a light pinprick or two, because I'd rather prick my finger than accidentally run a pin through my bear! So I stick my finger deep into the fold of my cuff. Then I fold the edge of my footie up, again, over the cuff. I hold these edges together firmly, and stick a pin in horizontally where they meet. I know when the pin is in the right place, because I can feel it with my fingertip!
If this method doesn't work for you, try marking each of the folded edges with a fabric marker or similar tool before removing everything from your bear. You can match these marks up again, afterwards, before sewing the footies on.
In preparation for running these seams, I like to get my footies safely out of the way. Simply push them inside each pant leg, while holding the cuff securely. This should help prevent any mishaps with run-away seams or obstructionist presser feet...
Before I run these seams, I push each footie inside each pant leg.
I also like to have a visual guide to help me keep this seam on the right track. So before moving my pins from the horizontal position to this new position, I use my fabric marker to draw some guiding "dots" around each cuff. You can see my marks faintly in blue, below.
I want my seams to closely follow this dotted line! I can erase the line, after, simply by spritzing it with a bit of water or tossing my finished garment in the laundry. My blue marks will simply disappear!
I want my seam to follow this dotted line...
See how my seam follows the dotted line? It doesn't have to be absolutely perfect.
As you can see, I followed the line of my dots pretty closely with my stitches! (See above) And with that, I have finished adding my footies. Now onwards to the final steps!
Final Steps!
Footies or not, you're going to need some kind of closure for this outfit. Like buttons, snaps, hook&loop, or perhaps a zipper?
Slip the garment on your bear, and then fold the remaining raw edges where they're going to overlap in the back. I like the topmost flap to suggest a line centered visually down the back of my bear. So I fold that flap, first, adjust the line until I am satisfied, and pin it in place. Then I fold and pin the other flap, too, but I don't fold it quite so deeply. When I'm using a plush fabric (such as fur), however, I prefer to line the area under the flap (where these pieces overlap) with a non-plush material, such as cotton. Doing so requires a few extra steps, not shown here...
Fold and adjust the edges of overlapping flaps in the back of your garment.
When I make a pair of teddy bear pajamas, I like to use hook&loop material (often referred to as Velcro) for my closure. This is also the standard method of closure for Build-A-Bear Workshop brand clothing and accessories, because hook&loop is pretty easy for kids to handle.
For this project, I've selected a garden variety hook&loop material. Literally— this low-pile hook&loop material can be found in the garden supply area of your local hardware store, because it's designed for gently securing plant stems, vines, and such to vertical supports.
See the green "Velcro" in the below images? It's double-sided! It's moderately inexpensive! It comes in a long roll, that stays pretty tidy in my sewing box! It never adds much thickness to my teddy bear garments, and it's fairly soft to the touch! All good qualities for projects, like this, which may end up in children's hands.
If you appreciate my ingenuity, but you don't particularly like the color of green garden "velcro", consider hook&loop wire ties, instead! These come in a rainbow of colors, designed for organizing and/or securing household wires and electronics. Check your office supply store!
Without getting into the nitty-gritty details of precisely how to secure your closure in place, suffice it to say you'll need to sew it down. With hook&loop, that's as simple as running some stitches over each "Velcro" strip using your sewing machine. The result should look something like this (see below):
Sew the closure in place. Closure seen here is a hook&loop material!
Foot-less!
A finished BAB Basic Jumpsuit, as seen from the back.
Footies!
A finished pair of BAB Footie Onesie Pajamas, as seen from the back.
And there you have it! Your garment is now complete. Or at least, these instructions are! If you have any questions, check my other blog entries to see if they've been answered elsewhere. And if not, send me an email and I'll see what I can do.
Enjoy yourself!